Thursday, April 29, 2010

100th Post -- 100 things to do before I die

Well, this is my 100th post on this blog. Never realized I had so much to say. Today, though I thought I'd keep it brief and just go over this list of 100 things I'd like to do before I die.

1. Celebrate my 100th birthday.
2. Be a size 6 again.
3. Go to Ireland.
4. Swim with dolphins.
5. Own a farm.
6. Learn to make cheese.
7. Learn to play the hammered dulcimer.
8. Have another baby.
9. Grow all of my own food.
10. Take my kids to Disney World.
11. See my kids graduate high school.
12. See my kids graduate college.
13. Have my own horse.
14. Learn to spin wool.
15. Learn to Tango.
16. Run a marathon.
17. Hike the Appalachian Trail.
18. Learn to speak Irish.
19. Ride a horse along a beach.
20. Go skinny dipping.
21. Cook and serve an entire meal that I grew.
22. Fly a kite.
23. Be in a movie.
24. Build a tree house.
25. Finish graduate school.
26. Have a manicure/pedicure (yes I've never had neither)
27. Be present at a birth (and not be the one giving birth).
28. Ride in a hot air balloon.
29. Ride a Harley.
30. Have my portrait painted. Completed May 2010!
31. Publish a book.
32. Be self employed.
33. See Niagara Falls.  June 2012!
34. See the Northern Lights.
35. Eat Italian food, in Italy.
36. Spend a week in silence.
37. Throw a surprise birthday party.
38. Have a surprise party thrown for me!
39. Get a tattoo.
40. Make a difference in someone's life.
41. Start a tree growing committee in my town, that donates grown trees to green up the area.
42. Meet Barack Obama.
43. Get my nose pierced.
44. Pay it forward through a toll booth.
45. Sit on a jury.
46. Shower in a waterfall.
47. Visit all 50 states in the US.
48. Go whale watching.
49. Milk a cow.
50. See the Mona Lisa, in person.
51. Be debt free (including mortgage!).
52. Have a house built, from my own plan.
53. Go camping in Yellowstone National Park.
54. See the Grand Canyon.
55. Buy an RV and tour the US with my kids before they grow up.
56. Teach my kids how to canoe.
57. Teach my kids how to fish.
58. Truly follow my heart every day. Live by my heart.
59. Eat a vegan diet for 30 days.
60. After that, try a raw foods diet for 30 days.
61. Visit a medieval castle in Europe.
62. Start a successful business.  January 2012!
63. Volunteer for a humanitarian cause.
64. Foster a rescue animal.
65. Live in a different country for at least six months.
66. Build my own website, with HTML.
67. Be a matchmaker, and attend their wedding.
68. Sleep under the stars, and not in a tent!
69. Nap in a hammock.
70. Get back into yoga, regularly.
71. Learn to crochet.
72. Go on a pic-nic with my family.
73. Have a honeymoon.  (Hubs and I did it for our 10th anniversary, June 2012!)
74. Be secure with my own spirituality. January 2010 -- Found my path as a proud Asatruar.
75. Learn to sail.
76. Join the mile high club.
77. Drink a vintage wine.
78. Watch a movie in a drive-in movie theater.
79. Win the lottery.
80. Go white water rafting.
81. Live in a log cabin.
82. Watch a lunar eclipse. Watched one 12/21/2010! :)
83. Participate in a protest.
84. Get over my fear of crowds.
85. Own my own chickens for eggs. Got my first girls June 2012!
86. Learn to make my own incense.
87. Learn to make natural candles.
89. Replace all the grass in my lawn with perennials that don't need mowing.
90. See hemp become legal in the U.S.
91. See same sex marriage become legal in the U.S.
92. Live in a home that has solar and/or wind powered electricity.
93. See the conflict in the middle east become peaceful.
94. Sew a dress for my daughter.
95. Sew clothes for myself!
96. Learn to make pottery.
97. Have a clean house, from top to bottom.
98. Be wise enough to know what makes me happy.
99. Leave some kind of positive legacy to my children.
100. Live happily ever after.

Tuesday, April 27, 2010

Light Bulb Give-away


Yay for free green stuff. Energy Efficient Now is giving away two free lightbulbs. All you need to do is sign up. Click here to get your two free light bulbs.

Enjoy!

Reuse -- Using cans in the garden


This blog is not a gardening blog. Honest. It's spring and that's what's on my mind right now, so deal. ;) Cans! I don't use cans in the kitchen much, mostly because of the BPA levels found in the plastic linings. I do, however, buy coffee that comes in cans, and I've come up with numerous uses for them. One of them using them as a seedling protector in the garden.


Once you've emptied the can, put it upside down in a can opener and remove the bottom, and discard it in your recycling bin.

What you'll get is a metal tube, just perfect for protecting your tomato seedlings from nasties and weather. The main reason I need these, is slugs and cut worms. Sunday night we had a huge storm, hail and all come through. The tomato seedlings that were protected by cans were the only ones that survived. I had one that just disappeared, likely washed away with the heavy rain. Sucky..

I'll keep my seedlings in these until they look like they're about to outgrow them. They have to be pulled up over the plant, so I would imagine about two weeks with this. Then the cans go in storage until next time, or the recycling bin.

My grandfather inspired this technique. Snooping around his old barn one day, I found paint cans with their bottoms taken out. I asked my dad what they were used for, and he explained the gardening tip. Funny how reusing things isn't some new age hippie thing, but a practical practice revisited.

Monday, April 26, 2010

Recycling Crafts -- Free eBook

I stumbled across this free eBook this morning and had to share. This book contains 42 ideas to reuse stuff into crafts, and the ideas are very cute. Please don't print it out, just save it and get busy with the kiddos.

For more information read here, and to just download it you can do that here.

Happy Crafting!

Menu Plan Monday

We're trying a new food this week called Quinoa. The recipe we're using is one Jessica found and she said it was pretty good, so we're giving it a go.

The rains last night beat up the garden pretty good. I'm sure this week you'll see some pictures of the hail, the slugs the rain brings, and more.


Monday: Vegetarian
  • Breakfast: French Toast, apple slices
  • Mid-morning Snack: Bananas
  • Lunch: Peanut Butter and Jelly, strawberries
  • Dinner: Quinoa and Black Beans (Spaghetti Cous-cous for the kids.)

    Tuesday: Vegetarian
  • Breakfast: Fruit Buffet
  • Mid-morning Snack: Peanut Butter and Apples
  • Lunch: Peanut Butter & Jelly
  • Dinner: Home made cheese pizza

    Wednesday:
  • Breakfast: Oatmeal
  • Mid-morning Snack: Fruit Salad
  • Lunch: Leftovers
  • Dinner: Kids at sitters (packed sandwich dinner)

    Thursday:
  • Breakfast: Eggs, Toast, Banana
  • Mid-morning Snack: Fruit Salad
  • Lunch: Peanut Butter/Jelly Sandwiches, Salad
  • Dinner: Chicken Parmesan

    Friday:
  • Breakfast: Cold Cereal/Oatmeal
  • Mid-morning Snack: Fruit
  • Lunch: Leftovers/Sandwiches
  • Dinner: Grilled Fish Tacos

    Saturday:
  • Breakfast: Pancakes, apple slices
  • Mid-morning Snack:
  • Lunch: Leftovers/TBD
  • Dinner: Leftovers

    Sunday:
  • Breakfast: Egg Sandwiches, banana
  • Mid-morning Snack: Church!
  • Lunch: Leftovers
  • Dinner: Out with Grandparents.
  • Sunday, April 25, 2010

    Lowe's Build and Grow Clinic


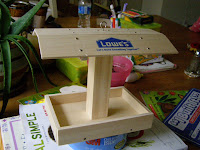
    Yesterday my son went to his first Build and Grow Clinic, and all I can say is wow! First of all, he got an apron, the kit, goggles, and a certificate...all of this was free. Completely free. He learned to use a small hammer, and built this bird feeder entirely by himself!


    My husband took him, and he had a blast. He absolutely loved it. He said half way through it how much fun it was to build it. Now all we need is birdseed, and to hang it up outside. How cute!! I can't think of a better way for him to spend a rainy Saturday morning. Honestly, we will be doing this as often as we are able to. You can't beat free father son time and building something you get to keep to boot. Anyway, here's the finished project. We're so proud of him. :)

    Saturday, April 24, 2010

    Nasturtium -- A garden must have


    It's hard to believe that after about 5+ years of vegetable gardening I have never grown a Nasturtium before this year. When visiting my best friend a few weeks ago, she raved about how easy this flower is to grow, and to grow it in between my vegetables. So, while out with her, I bought a few seed packets to take home and give this guy a try. Shortly after I got home, my daughter and I pushed a few of these seeds down in the ground.

    I haven't been weeding much because of this though. Mostly because I didn't know what the leaves looked like, I was afraid I'd pull up a baby flower instead of a weed. Yesterday however, I looked up what they looked like, so I could go out there and confidently avoid my baby Nasturtium's.

    So why plant them?

    1. They are edible! They are a beautiful addition to any salad, and I have read they taste similar to watercress. Once I have an abundant supply, I'll let you know my own personal thoughts on this.

    2. According to the book, Great Garden Companions (linked below), they are reputed to keep away cucumber beetles, so they make a great companion for you're cukes. They also create a habitat for predatory insects...you know, the ones you want in your garden to keep the nasties at bay.

    3. They are easy. Even you who has a black thumb can grow these babies. They are hard to kill, and generally reseed themselves year after year. So plant them, enjoy them, forget about them. They'll still be there.

    4. One plant will have a variety of colors on it. You'll have a beautiful variety of colors in your garden.

    5. Because they are a spreading plant, they act like a live mulch, preventing weeds, and helping your garden retain water. Meaning less work for you.

    This is a stock photo I found online, I'll be sure to post more pictures as mine continue to grow. The picture of the seedling up top is from the garden.

    Happy Saturday!!


    Thursday, April 22, 2010

    Earth Day -- The goal


    Today I'm not going to fill your mind with any ideas of what to do for earth day. I know that today of all days, you're going to be swamped with projects and philosophies. I do this every day as it's the overall goal of my blog. Instead,I'll be taking a step back and telling you what I will do with my day.

    This day to me is a lot like New Year's day. I make a pledge, a resolution. I take my New Year's resolution seriously, and make it my theme for the year. As I will do with my earth day resolution. So, whether you're new, and trying to learn how to recycle, or if you've been recycling for 20 years already add to this list. Add to the green list of things you can do, and change your habits. Drive less, recycle more, start a garden, whatever. Just make the commitment, and do it. So, what will your goal be?

    Happy Earth Day.

    Wednesday, April 21, 2010

    Garden update

    I was going to wait until tomorrow to post this, but I decided I couldn't wait. The rain this morning made such a good photo op.

    The peas are starting to grow, and will soon be latching on to the fencing I put up for them. My son is waiting patiently, he remembers how awesome they were last year. When you pick them off the vine they burst sweet sugar water in your mouth, so delicious and healthy.

    The broccoli and cauliflower are growing well. I'm still not sure how well they'll do. After doing some reading, apparently the spring harvest is usually more difficult then the fall harvest. If this crop doesn't work out, I'll be starting some new plants from the seed sometime in July and trying again the fall. I hear the fall harvest tastes better too. I've been checking the underside of the leaves for pests, and I haven't found anything yet. If I do find something my first line of defense will be a garlic/pepper spray.

    The lettuce is growing, and I'm expecting next week I'll probably have my first harvest. The kale is growing well too, I absolutely love kale, but this is my first time growing it, so I'm not sure when it will be ready for picking. If you click on the picture to enlarge it, you'll notice some tomato plants are popping up. I have no idea where these mystery tomatoes are coming from. This is a new bed with new dirt, but I'm going to allow some of them to grow. My guess is that they are chucked yellow pear tomatoes from last season. Less work for me to do I guess. :)


    Here is an obligatory pansy, just because it's pretty. Who doesn't love pansies, right?

    Tuesday, April 20, 2010

    Stretching the buck --- Homemade Organic Jelly


    Yesterday while at the store I got some grape juice with the intent on finishing home made jello part 2, with Agar. While I'm still planning on doing that, I got side tracked this morning and decided to use some of the juice to make home made jelly.

    In my grocery store, organic grape jelly can cost anywhere from 2.99 a jar, up to 4.99 a jar. By making it yourself, you can stretch your buck, and have home made organic grape jelly for less then a dollar a jar. First, bottle of grape juice shown in the picture above was 4.79. Ouch right? The box of pectin next to it usually goes for around two to three bucks a box, and organic sugar, can also be expensive. I've searched around, and found that Costco, now and then sells a 10 lb. bag of sugar for 12 bucks. Good deal compared to the four bucks for a two pound bag at the grocery store.

    So here's the directions:
  • First clean your jars thoroughly.
  • Boil them in water to sterilize them for at least 10 minutes.
  • In a cold stock pot, pour 3 cups of grape juice, and 3/4ths cup of water.
  • Add the box of pectin to the mix.
  • Now, turn on the heat on high, mixing in the pectin thoroughly.
  • When that reaches a boil, add 5 cups of sugar.
  • When it boils to the point where stirring it doesn't stop, allow it to boil for one minute while stirring constantly.
  • Now it's time for the freezer test. On a cold plate, put a glob of the hot grape jelly. Stick it in the freezer for about two minutes. Continue stirring the boiling pot. If the glob in the freezer is the right texture after about two minutes, your jelly is ready to be ladled into a can. If not, try again.
  • Once your jelly passes the freezer test, ladle the jelly into the jars. Seal the jars carefully and process them in boiling water again for 10 or more minutes depending on your altitude.


    This one batch made 7 half pint jars for me this morning. The amount yielded will depend on how long you have to boil. It only used 3 cups of juice from a 64 oz bottle( 8 cups, FYI). Meaning I could easily make 7 more half pint jars tomorrow, and still have enough to make my kids their jello. Consider the buck stretched.

    If you have questions on canning, I will happily answer.

  • Monday, April 19, 2010

    Menu Plan Monday

    So last week, or favorite meal of the week was the Tomato Bruschetta. We'll definitely be having it again this week. I'm also trying to transition us to a more vegetarian diet for the summer, so I will be adding in more and more vegetarian days. It's easier on the wallet too! :) This week's total, 75 bucks and change. Not bad for an organic eating family of four.


    Monday:
  • Breakfast: French Toast, apple slices
  • Mid-morning Snack: Bananas
  • Lunch: Grilled Cheese Sandwiches
  • Dinner: Shepherd's Pie (with ground turkey!)

    Tuesday: Vegetarian
  • Breakfast: Eggs and Toast
  • Mid-morning Snack: Peanut Butter and Apples
  • Lunch: Peanut Butter & Jelly
  • Dinner: Bruschetta/Speghetti

    Wednesday:
  • Breakfast: Oatmeal
  • Mid-morning Snack: Fruit Salad
  • Lunch: Leftovers
  • Dinner: Slow Cooker Chili

    Thursday: Vegetarian Day
  • Breakfast: Eggs, Toast, Banana
  • Mid-morning Snack: Fruit Salad
  • Lunch: Peanut Butter/Jelly Sandwiches, Salad
  • Dinner: Broccoli Alfredo

    Friday:
  • Breakfast: Cold Cereal/Oatmeal
  • Mid-morning Snack: Fruit
  • Lunch: Leftovers/Sandwiches
  • Dinner: Chicken and rice

    Saturday:
  • Breakfast: Pancakes, apple slices
  • Mid-morning Snack:
  • Lunch: Leftovers/TBD
  • Dinner: Leftovers

    Sunday:
  • Breakfast: Egg Sandwiches, banana
  • Mid-morning Snack: Church!
  • Lunch: Leftovers
  • Dinner: Out with Grandparents.
  • Sunday, April 18, 2010

    This weekend...busy!

    What a busy weekend. Busy is good, I suppose. Kid's played at a violin masterclass on Saturday, then one of my own students had a recital today. I was going to play piano with her, but decided it was better that someone else do it. Hopefully back to the grind tomorrow. We have our menu plan ready, and I'll be going to the store in the morning before I post it so I can get all the necessities for the week. We have most of the stuff already, so we're anticipating a cheap week this week.

    No job news for the hubs yet, but he's got another interview tomorrow he says. He had three last week, and was supposed to hear back from one on Friday, but...we didn't hear anything. When you don't hear, you assume it's no. He's been turned down so much, we can't get hopes up for anything right now. He's been unemployed now for five months. One thing I have learned though. I absolutely rock the budget, and thank god I have a cautious temperament when it comes to money. Nuff said.

    Friday, April 16, 2010

    Reuse -- Updating Picture Frames on the Cheap

    My mother in law loved pictures, and one of the things my husband lovingly remembers about her is the picture wall. When she passed away in 2005, we were given many of these pictures. I believe they were divided between my husband and his brother. Not really knowing what to do with these pictures, they had stayed in storage for quite some time. I had pulled a select few out, and the rest were not seen.

    However when I cleaned out my computer nook the other day, I decided I would update the frames and put them on a blank wall in the dining room. So I started with a picture of my brother in law with his wife on their wedding day, back in I believe 1996? That picture has probably been in there for those 14 years, so the frame needs some updating.


    I took the frame apart, including the glass, and set the photo and everything aside. Then I took it and my spray paint outside. I have never spray painted anything before that I can remember, however I have watched my dad do it as a kid, so I was hoping it was as easy as it looked.

    It definitely is as easy as it looks. Spray it lightly and you won't get runs. Very simple. In the end, I plan on having all black frames for photos in the dining room. This project will only cost me the $6.27 for the textured black spray paint. One can of paint will be enough for this project, and probably another as well. Easy easy, and I'm not spending money on new frames, or filling a landfill with old or unwanted items. Win win!


    Thursday, April 15, 2010

    Home-made Jello -- Part One

    Recently I had been feeling guilty, thinking my obsession with whole foods was taking something from my children. That they weren't able to enjoy the things I did as a kid. So, I've been brainstorming ideas that were better alternatives. The first one I came up with was home made jello.

    This first option for jello is made with plain store bought Gelatine. The alternative is to use Agar Agar, which I'm still trying to find. The issues I have with gelatin is what it's made from. If you don't know, you should have a look.

    You will need one packet per cup of juice, and 3/4ths of all your juice needs to be brought to a boil. I tried for a small amount of jello, so I used two cups of juice. I stuck 1 and a half cups in the microwave, and nuked it for 4 minutes to bring it to a boil. While I was waiting on that, I put the two packets of gelatin in the remaining half cup of juice and stirred.


    Then I poured the piping hot juice in a bowl, and combined it with the cold juice and mixed. Then stuck it in the fridge to cool for about two hours. I used a mix of lemonade and white grape juice for the flavoring. It could have used a little more sugar, but we didn't add any extra. If your kids are used to sweet desserts, you may want to add a few tablespoons of sugar, or other sweeteners. You can use any kind of juice, and if you want to experiment with adding fruit, you can definately do that too.

    Part two will be the comparison of regular gelatin and Agar Agar. Hopefully the kids won't know the difference.

    Wednesday, April 14, 2010

    Free Starbucks Coffee -- Spreading the word


    Tomorrow April 15th, Starbucks will give you free coffee if you come in with a reusable coffee cup.

    Click here for details.

    Tuesday, April 13, 2010

    Issues with Food Coloring

    Different colors in foods are made from many different things. Some of these things, are gross, others are potentially hazardous. I have done my best to avoid food coloring in my children's lives for as long as I could remember. Here's a few of some common food coloring found in food in the USA.


  • Red No. 4, also known as Carmine is produced from the cochineal insect. The insects are crushed to collect their dyes, which were originally used to dye clothes, but have made it's way to food too. Other then knowing your eating bug guts, this particular dye is not acceptable by vegetarians.
  • Red No. 3 is made of erythrosine, is a coal tar compound. (Nasty!) There is concern that it may be carcinogenic, and has been associated with thyroid tumors in lab rats.
  • Red No. 40 (Allura Red) is made of petroleum (yikes!!), and has been associated with increases in hyperactivity, and ADHD in children. This food coloring is outlawed in some European Nations.
  • Yellow No. 5 is made of tartrazine, which is also a coal tar compound. People with asthma, or aspirin sensitivity should avoid this dye, which pretty much lends to it not being very good for any of us.
  • Yellow No. 6 (Sunset Yellow) is also made of a coal tar compound. It is a sulfinated version of Sudan I which is a carcinogen. It has been outlawed in many countries in Europe.
  • Blue No. 1 (Brilliant Blue) like the others, is made of a coal tar compound. It is poorly absorbed in the gastro-intestinal tract, and can react with certain bile pigments to form green feces. (poo!)
  • Green No. 3 is a Triarylmethane dye, which mean it's derived from Triphenyl methane. This dye has been found to create tumors and has a Mutagenic effect. (Holy steaming potatoes batman!!) The European Union has outlawed this dye for food.

    Our family has been doing our best to be food coloring free for about 7 years. I am by no means an expert, so I've provided a bunch of links I used to read up on it. We aren't perfect (who is???) and of course now and then we slip and have something with food coloring. We jump right back on that wagon though, it's definitely a lifestyle change.


    Sources:
    1. Wise Geek
    2. Wikipedia
  • Monday, April 12, 2010

    Menu Plan Monday

    So for the last two weeks, I've been posting that I'm going to roast a chicken. Somehow, it got overlooked each week. We either, had tons of leftovers and didn't need to bother, or...we just didn't. Anyway, Monday, it's chicken or die! I'm trying out some new recipes this week, just surfing stuff online. I'll be sure to let you guys know if it ends up good or not.

    Monday:
  • Breakfast: Oatmeal, apple slices
  • Mid-morning Snack: Bananas
  • Lunch: Peanut Butter & Jelly
  • Dinner: Roasted Chicken and roasted vegetables, and I mean it this time.

    Tuesday:
  • Breakfast: Eggs and Toast
  • Mid-morning Snack: Peanut Butter and Apples
  • Lunch: Chicken Salad Sandwiches
  • Dinner: Turkey Meatloaf

    Wednesday:
  • Breakfast: Oatmeal
  • Mid-morning Snack: Fruit Salad
  • Lunch: Leftovers, Meatloaf sandwiches
  • Dinner: Chicken Drumsticks, Cauliflower and Apples

    Thursday: Vegetarian Day
  • Breakfast: Eggs, Toast, Banana
  • Mid-morning Snack: Fruit Salad
  • Lunch: Peanut Butter/Jelly Sandwiches, Salad
  • Dinner: Tomato Bruschetta

    Friday:
  • Breakfast: Cold Cereal/Oatmeal
  • Mid-morning Snack: Fruit
  • Lunch: Leftovers/Sandwiches
  • Dinner: Shrimp Tetrazzini

    Saturday:
  • Breakfast: Pancakes, apple slices
  • Mid-morning Snack:
  • Lunch: Taco Salads
  • Dinner: Leftovers

    Sunday:
  • Breakfast: Egg Sandwiches, banana
  • Mid-morning Snack: Church!
  • Lunch: Leftovers
  • Dinner: Out with Grandparents.
  • Sunday, April 11, 2010

    Clean Home, Fresh Start -- The Computer Desk!


    This may not seem like a big project, but really, to do it right, it was huge. My computer area had been a sneaky little hideaway spot for all the crap in the house. There was trash, three days worth of coffee cups, picture frames, the list seriously goes on. I don't think I've neatened up this space in a year. I'm pathetic, I know.


    Hubby was kind enough to take the kids to the park, and play play play while I tackled this mess. In hindsight, I should have started at the top. But I started in the middle instead collecting trash/recyclables. When that was all cleaned up a disgusting layer of dust was left. So, I dusted, then I worked my way down to the bottom. Removed the box of pictures in frames, and paper shredder. I had to vacuum in there, because...wow, nasty.


    Long story short, two and a half hours later I have a fully cleaned, dust and clutter free computer nook that is no longer embarrassing or a asthmatic's worst nightmare. It was quite the workout, having to go up and down the stairs numerous times to put things where they belonged. The printer that was on the middle shelf has now entered the yard sale pile, we lost the power source to it 5 years ago when we moved in. Told you I was pathetic.

    For more clean home stuff, check out the Happy Housewife's Clean Home, Fresh Start challenge.

    Thursday, April 8, 2010

    Garden Update

    This week we've had some record high temperatures, and the garden hasn't liked it too much. Typically our highs this time of year are in the 50-60's, and this week we've been breaking 90. It's HOT!


    My cool weather garden is surviving at the moment, but it doesn't seem to be too happy. This first shot here is some seeds I planted about 2 or 3 weeks ago. I planted a spring lettuce mix, a row of onions and some kale here. Lettuce won't sprout if it's too warm, so I'm waiting for this heat wave to pass before I put anymore in on the side garden.


    When I make a new row of seeds, I try to put something in to mark them, so I don't pull the new seedlings up thinking they are weeds. I managed to steal some of my son's army guys and put them to work. Another easy solution is to pocket some wooden stirrers from starbucks. That will probably be my next option. They'd probably look nicer then little soldiers. ;) Red soldier guy is protecting more kale that has sprouted, and behind him are my sugar snap peas. They'll grow up the trellis behind him. The blue army guy is protecting more lettuce, but they haven't sprouted yet. My guess is it's been too warm.

    This next picture is of my cauliflower and broccoli. I bought these already sprouted from Lowe's two weeks ago. They were doing fantastic until this heatwave. They're another cool weather plant. Luckily tomorrow it's supposed to cool back off. Hopefully I'll manage to get a bumper crop, our family really loves our broccoli and cauliflower and it freezes so easily, so it will last.

    Hopefully after the rains tonight and tomorrow I can get back out there this weekend with the cooler weather and plant more lettuce and sugar snap peas. My kids love to pick the peas off the vine. They are so super sweet, they love them.

    Tuesday, April 6, 2010

    Banana Bread


    We love our bananas in this house, but there always seems to be a few that get too ripe. Or, my mom ends up bringing me hers that she didn't get to. One or the other, I find my self often with almost all black bananas, perfect for banana bread.


    I found this banana bread recipe a while back, and have made it a few times. If you like a sweet bread dessert, that's not entirely unhealthy for your kids, I wholeheartedly suggest this.

    Here are a few tweaks I've made:

    3-4 Ripe Bananas (I don't use organic here)
    1/3 cup melted organic butter
    1 cup organic blond sugar (we like it sweet!!)
    1 beaten egg
    1 tsp vanilla extract (please don't waste your time with fake)
    1 tsp baking soda
    1 cup wheat all-purpose flour
    1/2 cup unbleached white all-purpose flour

  • Preheat the oven to 350°F (175°C).
  • Mix butter into the mashed bananas in a large mixing bowl. I use a potato masher here.
  • Mix in the sugar, egg, and vanilla.
  • Add the baking soda and salt over the mixture and mix in.
  • Add the flour last.
  • Pour mixture into a buttered 4x8 inch loaf pan.
  • Bake for 1 hour. Cool on a rack.


  • LinkWithin

    Related Posts with Thumbnails